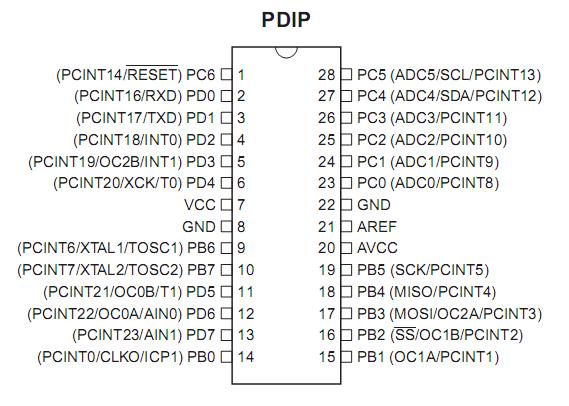
Arduino Programs:
Task 11 - Single LED Blink:
Created 1 June 2005
By David Cuartielles http://arduino.cc/en/Tutorial/Blink based on an orginal by H. Barragan for the Wiring i/o board */
int ledPin = 13; // LED connected to digital pin 13
// The setup() method runs once, when the sketch starts
void setup() {
// initialize the digital pin as an output:
pinMode(ledPin, OUTPUT);
}
// the loop() method runs over and over again,
// as long as the Arduino has power
void loop()
{
digitalWrite(ledPin, HIGH); // set the LED on
delay(1000); // wait for a second
digitalWrite(ledPin, LOW); // set the LED off
delay(1000); // wait for a second
}
Task 12 - Single LED Blink - Timing Variation:
Same as above program with minor change, after every 10 blinks led turns off for 10 seconds and then carries on blinking
void loop()
{
for (int i = 0; i <= 10; i++){ // blink for 10 times
digitalWrite(ledPin, HIGH); // set the LED on
delay(1000); // wait for a second
digitalWrite(ledPin, LOW); // set the LED off
delay(1000); // wait for a second
}
delay(10000); //wait 10 seconds
}
Task 13 - Led mostly off Program:
Initialization code same as classic blink:
Led on for 1 second, off for 10
void loop()
{
digitalWrite(ledPin, HIGH); // set the LED on
delay(1000); // wait for a second
digitalWrite(ledPin, LOW); // set the LED off
delay(10000); // wait for a second
}
Task 14 - Led mostly on Program:
Initialization code same as classic blink:
Led on for 10 seconds, off for 1
void loop()
{
digitalWrite(ledPin, HIGH); // set the LED on
delay(10000); // wait for a second
digitalWrite(ledPin, LOW); // set the LED off
delay(1000); // wait for a second
}
Task 15 - External LED
Code Same as above examples however uses an external LED placed on breadboard and connected to pin 13 of the arduino in conjunction with a 330ohm current limiting resistor.
Task 16 - Classic 2 LED
Classic 2 LED blink program:
By David Cuartielles. Adapted by Peter Brook
based on an orginal by H. Barragan for the Wiring i/o board
*/
int ledPin = 13; // LED connected to digital pin 13
int redLedPin = 12; // LED connected to digital pin 13
int del =500;
// The setup() method runs once, when the sketch starts
void setup() {
// initialize the digital pin as an output:
pinMode(ledPin, OUTPUT);
pinMode(redLedPin, OUTPUT);
}
// the loop() method runs over and over again,
// as long as the Arduino has power
void loop()
{
digitalWrite(ledPin, HIGH); // set the LED on
digitalWrite(redLedPin, LOW); // set the LED Off
delay(del); // wait
digitalWrite(ledPin, LOW); // set the LED off
digitalWrite(redLedPin, HIGH); // set the LED on
delay(del); // wait
}
Task 17 - 2 LED's blinking in unison
Same basic program as above however changes made to loop segment so LED's blink in unison:
void loop()
{
digitalWrite(ledPin, HIGH); // set the LED on
digitalWrite(redLedPin, HIGH); // set the LED on
delay(del); // wait
digitalWrite(ledPin, LOW); // set the LED off
digitalWrite(redLedPin, LOW); // set the LEDoff
delay(del); // wait
}
Task 18 - 2 LED's Individual speed
Individual speed control for LED's:
Using internal running timer in mills as reference:
--------------------------------------------------------
Thanks to Arduino language reference:
--------------------------------------------------------
int redLed = 7; // define red led
int yellowLed = 6; // define yellow led
unsigned long time;
int ledStateRed = LOW; // ledState used to set the LED
long previousTimeRed = 0;
int intervalRed = 10000;
int ledStateYellow = LOW; // ledState used to set the LED
long previousTimeYellow = 0;
int intervalYellow = 250;
void setup(){
pinMode(redLed, OUTPUT); // red led setup as output
pinMode(yellowLed, OUTPUT); // yellow led setup as output
}
void loop()
{
time = millis();
if(time - previousTimeRed > intervalRed) { //Time running
previousTimeRed = time;
if (ledStateRed == LOW)
ledStateRed = HIGH;
else
ledStateRed = LOW;
digitalWrite(redLed, ledStateRed);
}
if(time - previousTimeYellow > intervalYellow) {
previousTimeYellow= time;
if (ledStateYellow == LOW)
ledStateYellow = HIGH;
else
ledStateYellow = LOW;
digitalWrite(yellowLed, ledStateYellow);
}
}
Task 19 - ASCII Printing program:
Copied from :http://arduino.cc/en/Tutorial/ASCIITable and run on Arduino uno